Self-Hosting Part 2: Mail Server
Introduction
I hope you are excited for Part 2 of the Self-Hosting Series, a guide on how to run a secure personal mail server! You can check out the rationale for this series in Part 1: Why I'm Ditching iCloud. For this post, we will be replacing iCloud Mail and iCloud Notes. Even though Apple touts itself as a privacy-focused company, email is one of the few iCloud services that isn't encrypted at rest by Apple. Here is a capture of the relevant section of the 'iCloud Security Overview':
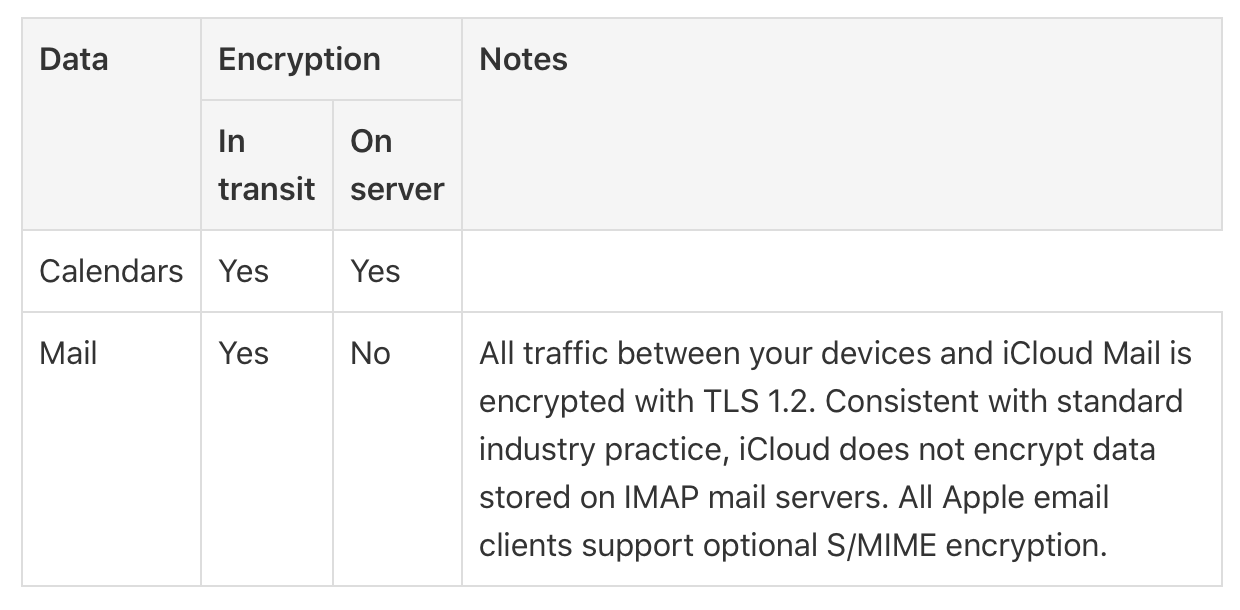
However, encryption at rest doesn't make a tangible difference to users because the private keys are stored on site as well, allowing for decryption at any time. This pushed me to search for an alternative to services such as iCloud Mail and Gmail, which finally led to self-hosting as a solution. I have been running a personal mail server for two years now, and although it wasn't easy, it has definitely remained manageable.
Components of a Mail Server
A mail server relies on two protocols, Simple Mail Transfer Protocol (SMTP) and Internet Message Access Protocol (IMAP). SMTP is used to send and receive mail between different mail servers. IMAP is for clients to download messages, check drafts, and compose emails.
We will be installing SMTP and IMAP software, postfix and dovecot respectively. We will be running Postfix on port 25 and port 465. Port 25 is used for most SMTP mail transfer but is commonly blocked by many ISPs, so make sure to check if it is open on your network. Port 465 is the SMTPS port, a port that defaults to a TLS/SSL wrapper. RFC 8314 actually recommends using SMTPS by default. Lastly, Dovecot will be served over the IMAPS port, which is port 993.
Installation Guide
Before You Start
This guide assumes that you already have a VPS or another server set up securely with port 25 traffic available. If you need a guide on how to setup a VPS, I have posted one in the past. Furthermore, we assume that you are using Cloudflare as your DNS nameserver.
DNS Records
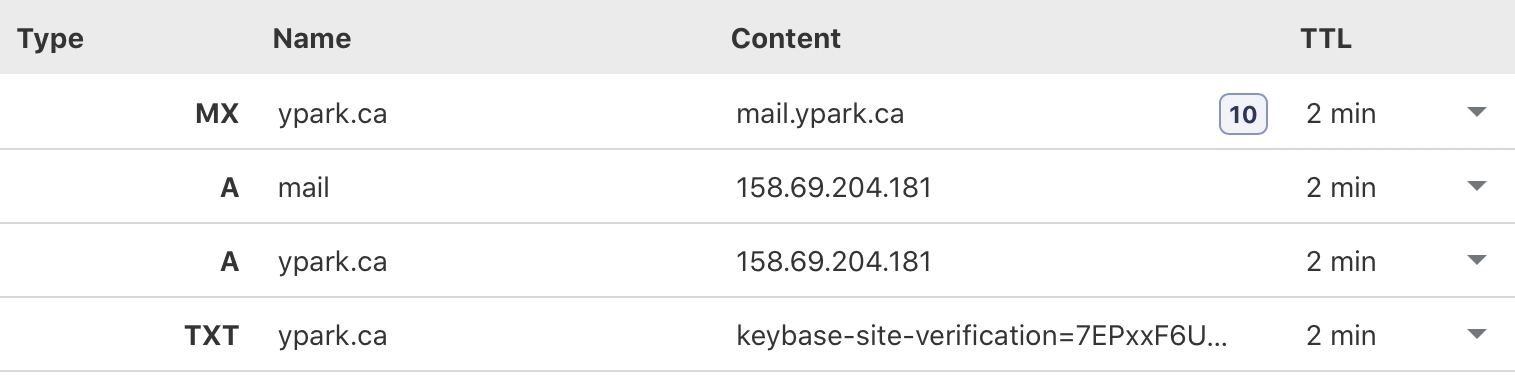
Open the Cloudflare DNS Settings, and define an A record for your mail server. For the rest of this article, we will assume this A record is for mail.ypark.ca. Now, if you want to receive mail at bobby@ypark.ca, then add an MX record for the root (@), pointing to mail.ypark.ca. If you want to receive mail at bobby@user.ypark.ca, then add an MX record for user.ypark.ca (i.e. user).
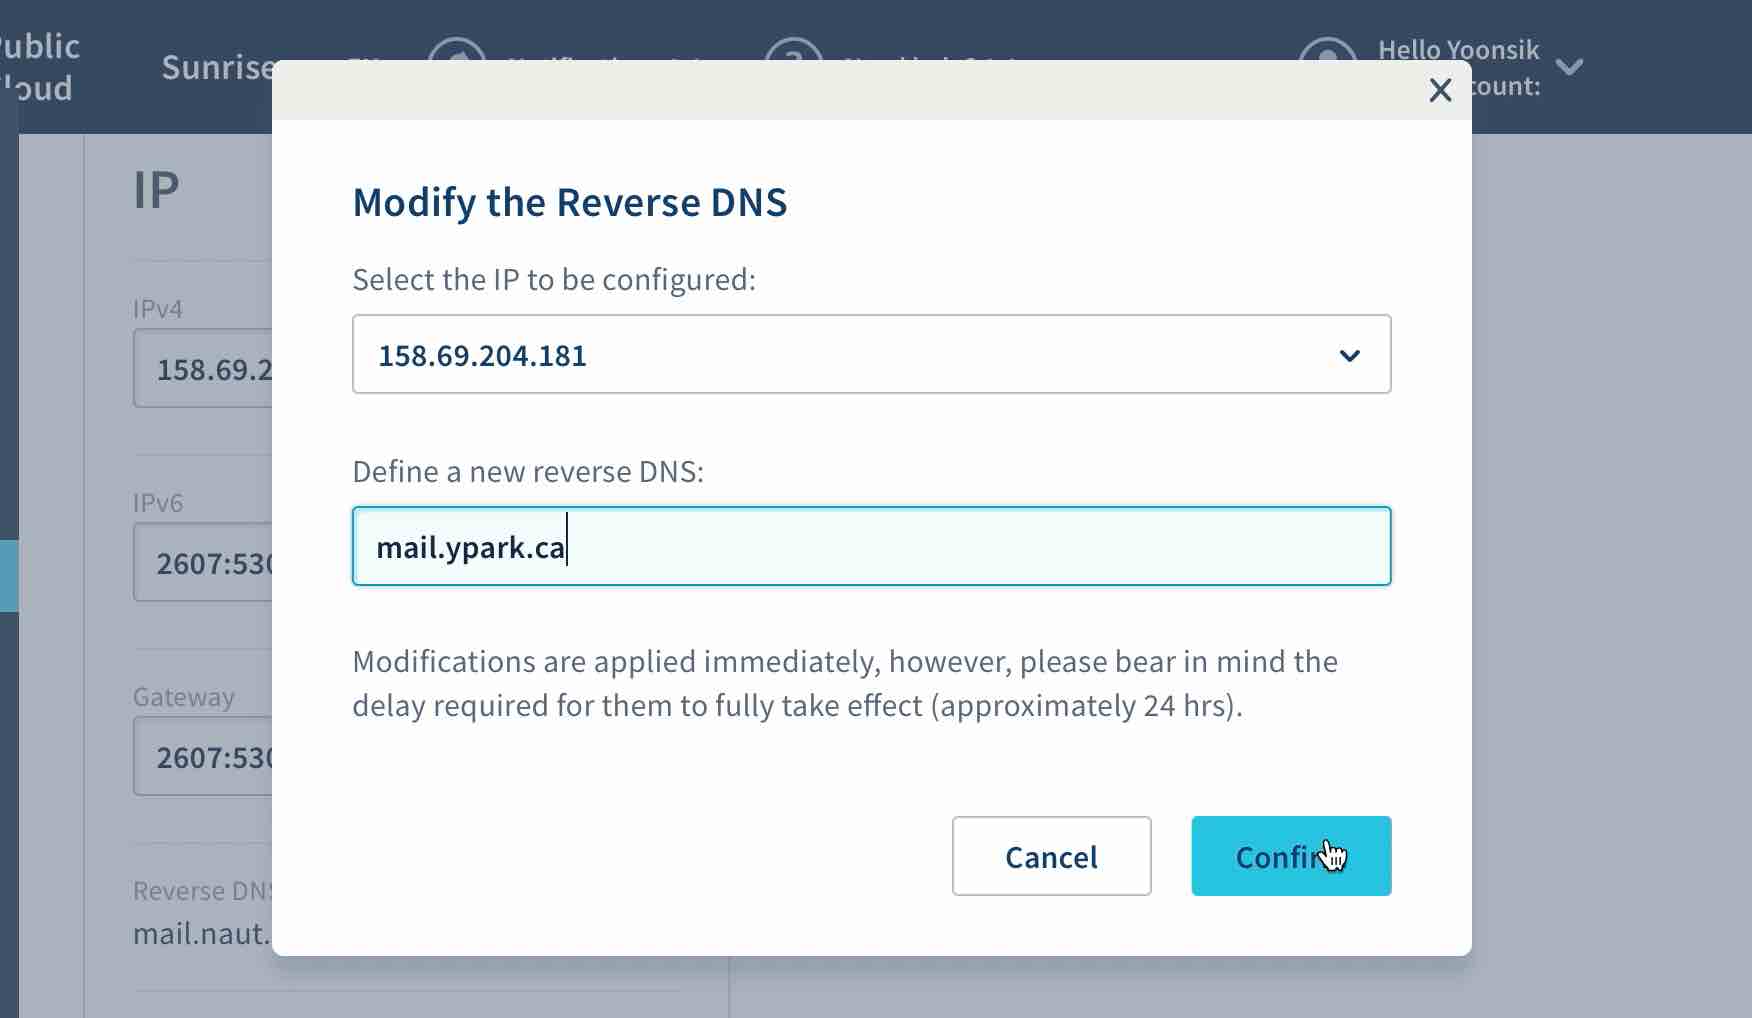
Reverse DNS
Reverse DNS records are essential for running a mail server, since it protects against spam. Open your VPS settings or contact your ISP, and add a reverse DNS hostname for your IPv4 address. From the above example, this would be mail.ypark.ca.
Set Hostname
The server needs to know its fully qualified domain name (FQDN) for easier installation of postfix later.
#sudo nano /etc/hostname

mail.ypark.ca
Setup Email Addresses
First, we need to make a user for our desired email address. If you want an email address of bobby@ypark.ca then make sure that a bobby user doesn't already exist on the server. If it does, delete it, and create a separate user for administration purposes.
The username you choose here will be the part of the email address that comes before the @ypark.ca suffix. The following command ensures that the user we are adding has reduced privileges.
sudo adduser --shell /usr/sbin/nologin bobby
The password that you decide here will be used for logging into your email account.
Setup Aliases
Now, we will set up aliases. Alias configuration allows emails sent to addresses such as root@ypark.ca and postmaster@ypark.ca to be redirected to another address like bobby@ypark.ca.
#sudo nano /etc/aliases

postmaster: root
root: bobby
Finally, update the aliases in memory.
sudo newaliases
Postfix and Dovecot Installation
Start by installing Postfix and dovecot.
sudo apt install postfix dovecot-imapd
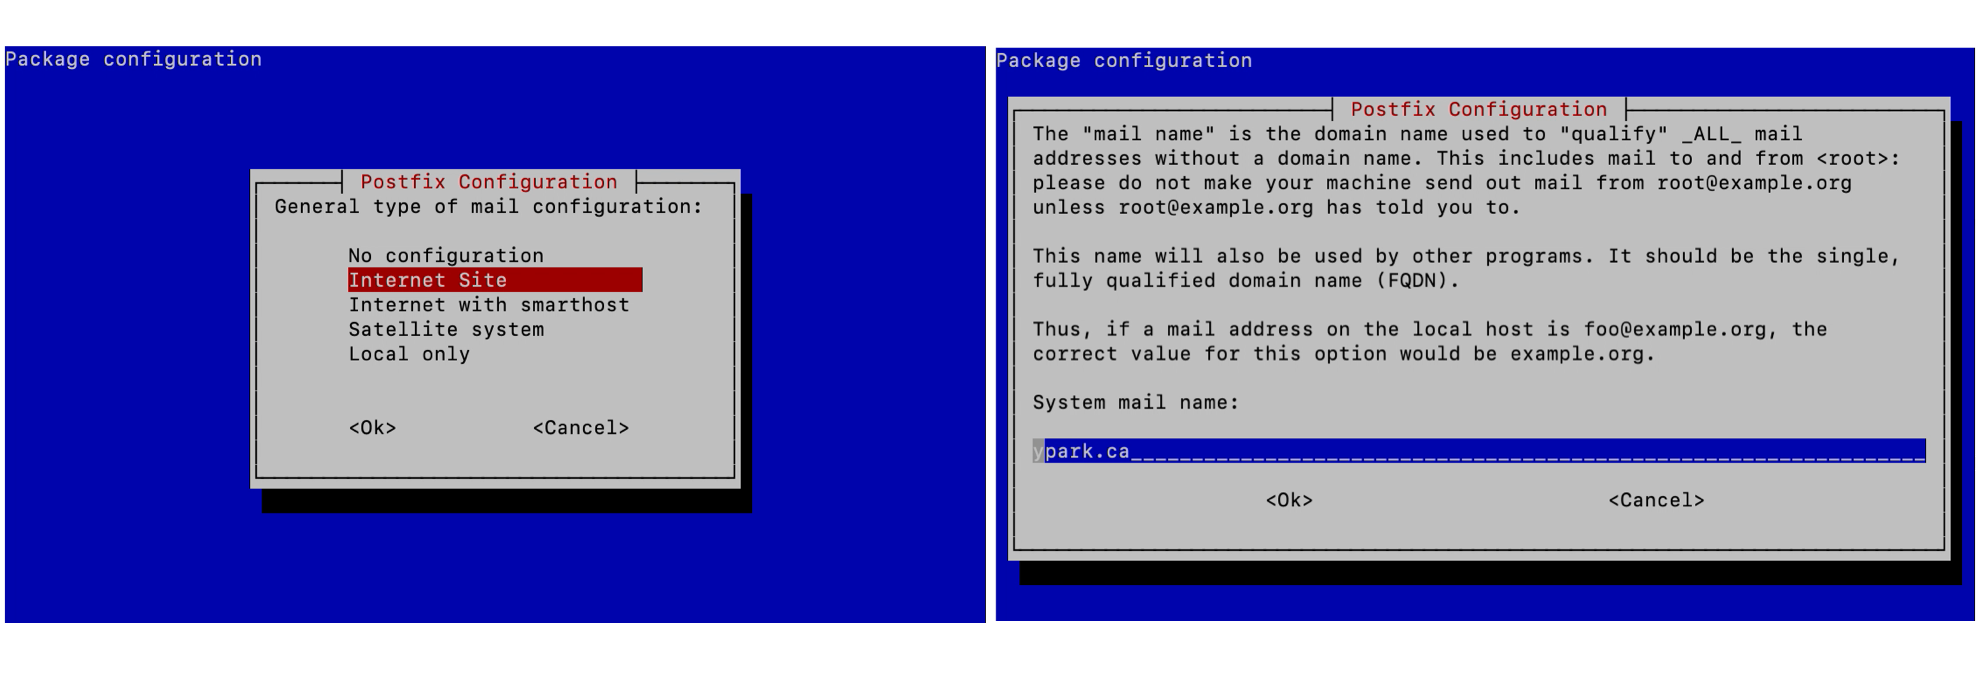
During the Postfix Configuration screen, select "Internet Site", and type in the domain that you would like at the end of your email address (the MX record from above).
Store Mail in the Home Directory
We need to store incoming messages in the user's home directory. Run the following command for Postfix.
sudo postconf -e "home_mailbox = Maildir/"
Then, edit the Dovecot 10-mail.conf configuration file to the following:
#sudo nano /etc/dovecot/conf.d/10-mail.conf

mail_location = maildir:~/Maildir
Obtain Let's Encrypt SSL Certificate
We can install a Let's Encrypt certificate generator called acme.sh, and its dependency socat on the root account:
sudo su
wget -O -  https://get.acme.sh | sh
sudo apt install socat
exit
sudo su
We exit and log back in to refresh the environment variables. Next, we obtain an SSL certificate by proving we own the mail.ypark.ca domain. This is done by running a web server on port 80 (make sure it's allowed in your firewall). Remember to substitute the domain in the command with that of your VPS/server, which could be different from your email address domain (i.e. not ypark.ca).
acme.sh --issue -d mail.ypark.ca --standalone --force
Now we can set up a scheduled job to copy the issued SSL certificate to our certificate/key directory, as well as reload Postfix and Dovecot. Once again, substitute all instances of mail.ypark.ca with the domain of your mail server.
acme.sh --install-cert -d mail.ypark.ca --key-file /etc/ssl/private/mail.ypark.ca.key --fullchain-file /etc/ssl/certs/mail.ypark.ca.pem --reloadcmd "sudo postfix reload; sudo dovecot reload" --force
Enabling Dovecot SSL and Login
Here we will be enabling TLSv1.2, which only works if you have at least iOS 12 and macOS 10.15.
Modify the SSL requirements for Dovecot in 10-ssl.conf:
#sudo nano /etc/dovecot/conf.d/10-ssl.conf

ssl = required
ssl_cert = </etc/ssl/certs/mail.ypark.ca.pem
ssl_key = </etc/ssl/private/mail.ypark.ca.key
ssl_min_protocol = TLSv1.2
ssl_prefer_server_ciphers=yes
Next, prevent Dovecot logins from occurring over plain text:
#sudo nano /etc/dovecot/conf.d/10-auth.conf

disable_plaintext_auth = yes
auth_mechanisms = plain login
Next we allow IMAPS connections within the 10-master.conf file. IMAP doesn't use SSL, so we don't enable it:
#sudo nano /etc/dovecot/conf.d/10-master.conf

service imap-login {
  inet_listener imap {
    #port = 143
  }
  inet_listener imaps {
    port = 993
    ssl = yes
  }
}
Lastly, in the same file, we enable Dovecot's login service, which Postfix will be using later:
#sudo nano /etc/dovecot/conf.d/10-master.conf

  # Postfix smtp-auth
  unix_listener /var/spool/postfix/private/auth {
    mode = 0666
  }
Enabling Postfix SSL and Login
Let's add SSL support to Postfix as well:
#sudo nano /etc/postfix/main.cf

smtpd_tls_cert_file=/etc/ssl/certs/mail.ypark.ca.pem
smtpd_tls_key_file=/etc/ssl/private/mail.ypark.ca.key
Ensure that Postfix will only send outgoing SMTP mail messages if they are authorized, i.e. with a valid username/password:
#sudo nano /etc/postfix/main.cf

#### SASL ####
## specify SASL type ##
smtpd_sasl_type = dovecot
smtpd_sasl_path = private/auth
smtpd_sasl_local_domain = $myhostname
smtpd_sasl_security_options = noanonymous

## enable SMTP auth ##
smtpd_sasl_auth_enable = yes
smtpd_recipient_restrictions = permit_mynetworks, permit_sasl_authenticated, reject_unauth_destination
Next, force Postfix to use SSL for logins:
#sudo nano /etc/postfix/main.cf

#### SSL/TLS parameters ####
smtpd_tls_auth_only = yes
smtpd_tls_loglevel = 1
Also, change Postfix hostname to your server's hostname:
#sudo nano /etc/postfix/main.cf
myhostname = mail.ypark.ca
We want to disable login through port 25, as this is vulnerable to man-in-the-middle attacks. Open master.cf and uncomment the following option:
#sudo nano /etc/postfix/master.cf

smtp      inet  n       -       y       -       -       smtpd
  -o smtpd_sasl_auth_enable=no
Lastly, we will enable the SMTPS service, which enforces SSL by default. Simply scroll down and uncomment the smtps service, as well as the following options:
#sudo nano /etc/postfix/master.cf

smtps     inet  n       -       y       -       -       smtpd
  -o syslog_name=postfix/smtps
  -o smtpd_tls_wrappermode=yes
  -o smtpd_sasl_auth_enable=yes
#  -o smtpd_reject_unlisted_recipient=no
#  -o smtpd_client_restrictions=$mua_client_restrictions
#  -o smtpd_helo_restrictions=$mua_helo_restrictions
#  -o smtpd_sender_restrictions=$mua_sender_restrictions
  -o smtpd_recipient_restrictions=permit_sasl_authenticated,reject
Update Diffie-Hellman Parameters
For effective forward secrecy, you need a set of Diffie-Hellman Parameters that aren't being used elsewhere. We can generate new parameters with the following:
cd /etc/ssl/certs
sudo openssl dhparam -out dhparams.pem 2048
Next, update both Postfix and Dovecot to use these new parameters. For Postfix, edit the main.cf file:
#sudo nano /etc/postfix/main.cf

smtpd_tls_dh1024_param_file = /etc/ssl/certs/dhparams.pem
For Dovecot, edit the 10-ssl.conf file:
#sudo nano /etc/dovecot/conf.d/10-ssl.conf

ssl_dh = </etc/ssl/certs/dhparams.pem
Dovecot SSL Hardening
Since we have control over the devices being used with Dovecot, the following is relatively safe. We will disable non-EC Diffie-Hellman by uncommenting the following line in the 10-ssl.conf file:
#sudo nano /etc/dovecot/conf.d/10-ssl.conf

# To disable non-EC DH, use:
ssl_cipher_list = ALL:!DH:!kRSA:!SRP:!kDHd:!DSS:!aNULL:!eNULL:!EXPORT:!DES:!3DES:!MD5:!PSK:!RC4:!ADH:!LOW@STRENGTH

# or to disable SHA-1, ssl_cipher_list = ALL:!DH:!kRSA:!SRP:!kDHd:!DSS:!aNULL:!eNULL:!EXPORT:!DES:!3DES:!MD5:!PSK:!RC4:!ADH:!SHA:!LOW@STRENGTH
Postfix SSL Hardening
The following configuration ensures that only high security ciphers are used to communicate between servers (if they both support SSL). Also, this enforces the usage of at least TLSv1.2. However, you can run into problems if the mail recipient doesn't support the newer standard. In this case, the connection will fail gracefully into an unencrypted (!) mode, but you shouldn't face any mail delivery problems. However, later on, once we start enforcing encryption, delivery problems may occur.
#sudo nano /etc/postfix/main.cf

## force email client high security ##
smtp_tls_protocols = !SSLv2,!SSLv3,!TLSv1,!TLSv1.1
smtp_tls_ciphers = high
smtp_tls_mandatory_protocols = !SSLv2,!SSLv3,!TLSv1,!TLSv1.1
smtp_tls_mandatory_ciphers = high

smtpd_tls_protocols = !SSLv2,!SSLv3,!TLSv1,!TLSv1.1
smtpd_tls_ciphers = high
smtpd_tls_mandatory_protocols = !SSLv2,!SSLv3,!TLSv1,!TLSv1.1
smtpd_tls_mandatory_ciphers = high

tls_preempt_cipherlist = yes
Break the Rules (more Postfix SSL hardening)
This configuration has the ability to break mail delivery, but it serves as protection against a man-in-the-middle attack. Most mail delivery over port 25 is vulnerable because it begins over a plain text connection before upgrading to SSL (STARTTLS). By enforcing encryption, any mail we receive will be encrypted. Furthermore, any mail server we connect to will be verified to have an SSL certificate that matches the corresponding MX record/domain. We can't use smtp_tls_security_level = secure, otherwise we can't send mail to servers that have a domain name different from that of the receiver's email address. This configuration is most similar to an always-on Message Transfer Aagent Strict Transport Security (MTA-STS) policy.
#sudo nano /etc/postfix/main.cf

#### SSL/TLS parameters ####
smtpd_tls_security_level = encrypt
smtp_tls_security_level = verify
smtp_tls_CAfile = /etc/ssl/certs/ca-certificates.crt

smtp_tls_exclude_ciphers = aNULL, eNULL, PSK, SHA, SHA256, SHA384, DSS, AESCCM
smtpd_tls_exclude_ciphers = aNULL, eNULL, PSK, SHA, SHA256, SHA384, DSS, AESCCM

smtp_tls_mandatory_exclude_ciphers = aNULL, eNULL, PSK, SHA, SHA256, SHA384, DSS, AESCCM
smtpd_tls_mandatory_exclude_ciphers = aNULL, eNULL, PSK, SHA, SHA256, SHA384, DSS, AESCCM
Restart Postfix and Dovecot
sudo service postfix stop
sudo service postfix start
sudo service dovecot stop
sudo service dovecot start
Protect Against DNS MITM
While the section above helped prevent downgrade attacks from MITM of the SMTP protocol, it does not help prevent MITM of DNS entries, i.e. the MX records. In simpler terms, an attacker could MITM a DNS request and replace it with a false MX record that points to their own server, which could then present a valid SSL certificate for an arbitrary domain. If you wanted to send mail to my email address, you would have no idea that the it was being sent to a fake mail server. This could potentially be remedied by a long list of domains and their SSL capabilities, as described by "Roll Your Own Network".
However, my current solution is to use DNS over HTTPS, which prevents network level modification of DNS requests. There are many guides online to setting up your own DNS over HTTPS DNS resolver, including one by Cloudflare.
Lastly, there exists a new DNS record that tells other mail servers to enforce encryption and validation before connecting to your mail server called MTA-STS, as mentioned above. An MTA-STS record enforces an encrypted session of TLSv1.2 or better and validates the domain name for your SSL certificate. However, once these records become cached, they will resist DNS MITM, thus enforcing secure encryption.
Configure with Fail2ban
We can install Fail2ban to protect our SSH, Postfix, and Dovecot services from repeated brute force attacks. The install command is:
sudo apt install fail2ban
This is the configuration for protecting Postfix (SASL) and Dovecot Login Attempts (SSH is enabled by default). Change bantime to how long you want the ban to last.
#sudo nano /etc/fail2ban/jail.local

[DEFAULT]
bantime  = 60m
findtime  = 10m
maxretry = 5

[postfix-sasl]
enabled = true
filter = postfix[mode=auth]
port = smtp,465,submission
logpath = /var/log/mail.log
maxretry = 3

[dovecot]
enabled = true
filter = dovecot
logpath = /var/log/mail.log
maxretry = 5
Configure with UFW
If you are already running Uncomplicated Firewall (UFW), then you don't need to worry about allowing all the port numbers. Just run the following commands to allow connections to the mail server.
sudo ufw allow smtp
sudo ufw allow imaps
sudo ufw allow smtps
Adding SPF and DMARC DNS Records
SPF and DMARC records help reduce the chances that other email providers filter out your domain as spam. If you go back to Cloudflare's DNS management page, you can add both of these records.
For SPF, you can use this SPF generator to help create your record. My SPF record was the following:
Record: TXT
Name: ypark.ca
Content: ypark.ca v=spf1 mx -all
This was my DMARC record:
Record: TXT
Name: _dmarc
Content: v=DMARC1; p=reject; rua=mailto:postmaster@naut.ca; ruf=mailto:postmaster@naut.ca; aspf=s
Adding DKIM Header and Records
DKIM also helps reduce the chances that your emails are marked as spam. I used the following guide:
Enable Spam Filtering
Although this is a bit out of scope for the article, you will definitely want to stop spam from reaching your newly formed mail server! You can use the following guide to help Postfix filter spam, using an SPF policy agent. This tool verifies that the SPF records of the incoming mail servers are valid.
After enabling that, a few more spam emails still slipped into my inbox, so I changed my Postfix recipient restrictions one more time to look like this:
#sudo nano /etc/postfix/main.cf

smtpd_recipient_restrictions = permit_mynetworks, permit_sasl_authenticated, reject_unauth_destination, check_policy_service unix:private/policyd-spf, reject_rbl_client zen.spamhaus.org
This configuration is using a spam domain blacklist. Find out how to enable one here.
Email Client Configuration
For your mail client, configure both SMTP and IMAP to use the address of the mail server. Use the same username and password that was created earlier. Enable Forced TLS encryption if available, and avoid STARTTLS.
Server: mail.ypark.ca
SMTP(S) Port: 465
IMAP(S) Port: 993
Username: bobby
Password: ********
Testing Mail Delivery
Mail Tester | mail-tester.com is an extremely useful tool in diagnosing mail delivery problems, and the "spamminess" of your mail server.

Dovecot Bugfix
If some of your mail clients are failing to connect to IMAP after a few minutes, then this StackExchange article may be of help. It explains how to increase Dovecot's internal user+IP limits, which fixed my problem.
Postfix Delayed Mail Delivery Warning
Sometimes, Postfix is unable to send mail to a server due to the stringent security settings that were enabled earlier. Usually, Postfix will try sending the email for 4-5 days, and then notify the sender about a mail delivery error. However, in this case, it is beneficial to be notified of delivery delays much earlier. You can be notified of >4hr delays by adding the following lines to your main.cf file.
#sudo nano /etc/postfix/main.cf

delay_warning_time=4h
confirm_delay_cleared=yes
Increase Postfix Attachment Size Limit
Most email providers now allow attachments of 15MB or larger, while Postfix has a default limit of 10MB. You should increase it as shown below.
#sudo nano /etc/postfix/main.cf

message_size_limit = 52428800