Self-Hosting Part 3: WebDAV Server
Introduction
This is Part 3 of the Self-Hosting Series, a guide on how to run a CalDAV and CardDAV server! As always, you can check out the rationale for this series in Part 1: Why I'm Ditching iCloud. In this guide, we will be replacing iCloud Calendar, iCloud Contacts and iCloud Reminders, using the Python Radicale package.
Server Installation
We will be using the root account for all the commands in this guide. Start by dropping into a root shell. Then install the Radicale package from the PyPI servers, as well as the password hashing tools used for authentication.
# Drop into a root shell
sudo su
python3 -m pip install --upgrade radicale[bcrypt]
apt install apache2-utils
Create a seperate radicale user, for running radicale:
useradd --system --home-dir / --shell /sbin/nologin radicale
Next, generate the users file which will contain the accounts that will be accessing this server:
mkdir /etc/radicale
touch /etc/radicale/users
chown radicale:radicale /etc/radicale/users
chmod 400 /etc/radicale/users
To add a user run the following command, which will prompt for the password.
htpasswd -B /etc/radicale/users username_here
Create the directory which will store our CalDAV and CardDAV collections:
mkdir -p /var/lib/radicale/collections && chown -R radicale:radicale /var/lib/radicale/collections
Next, create the radicale config file, with the following defaults:
# nano /etc/radicale/config

[server]
max_connections = 20
# 100 Megabyte
max_content_length = 100000000
# 30 seconds
timeout = 30

[auth]
# Average delay after failed login attempts in seconds
delay = 1

type = htpasswd
htpasswd_filename = /etc/radicale/users
# encryption method used in the htpasswd file
htpasswd_encryption = bcrypt
Now we can configure a systemd service, which will automatically start radicale upon boot:
# nano /etc/systemd/system/radicale.service
[Unit]
Description=A simple CalDAV (calendar) and CardDAV (contact) server
After=network.target
Requires=network.target

[Service]
ExecStart=/usr/bin/env python3 -m radicale
Restart=on-failure
User=radicale
# Deny other users access to the calendar data
UMask=0027
# Optional security settings
PrivateTmp=true
ProtectSystem=strict
ProtectHome=true
PrivateDevices=true
ProtectKernelTunables=true
ProtectKernelModules=true
ProtectControlGroups=true
NoNewPrivileges=true
ReadWritePaths=/var/lib/radicale/collections

[Install]
WantedBy=multi-user.target
Finally, we can enable and start the radicale service. Note that radicale will only serve localhost at this point.
# Enable the service
systemctl enable radicale
# Start the service
systemctl start radicale
For general access, set up a reverse proxy such as nginx in front of the radicale server. Here is a sample nginx configuration.
server {
	listen 443 ssl http2;
	listen [::]:443 ssl http2;
	ssl_dhparam /etc/ssl/certs/dhparams.pem;
	include snippets/lets_encrypt.conf;
	server_name caldav.naut.ca carddav.naut.ca;
	location / {
		proxy_pass http://127.0.0.1:5232;
		proxy_set_header Host $host;
		proxy_set_header X-Real-IP $remote_addr;
		proxy_set_header X-Forwarded-For $proxy_add_x_forwarded_for;
		proxy_set_header X-Forwarded-Proto $scheme;
	}
}
Fix Contacts
In some cases, you will find that your contacts aren't being synced. To fix this, open your web browser and navigate to the Radicale server. On the login screen, type in the username and password you created above. Click Create new addressbook or calendar, and create a collection of type addressbook, using the name "Contacts". Finally, on your device, delete and re-add the Contacts server.
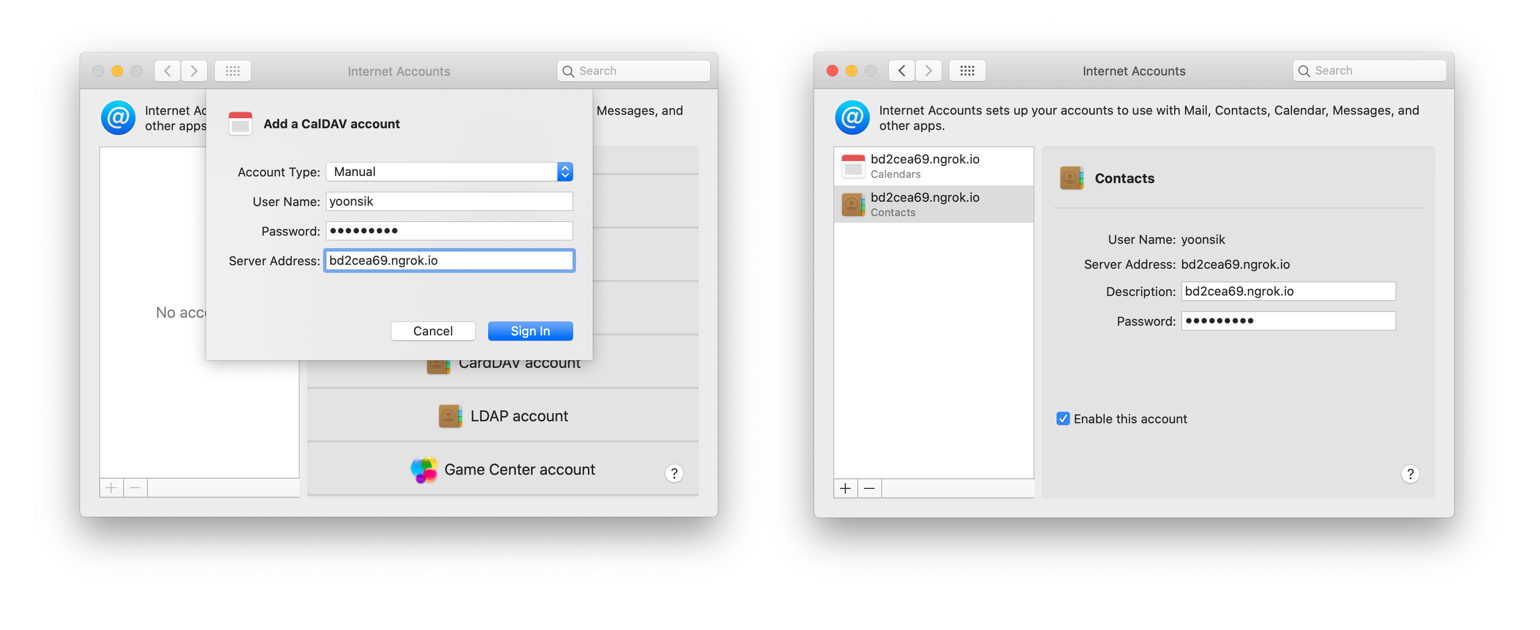
Client Connection
You can now connect to your server by going to System Preferences, Internet Accounts, and then adding both a CalDAV and CardDAV account!