Wireguard VPN for macOS & iOS
There's been a lot of fanfare in the Linux community about the mainlining of Wireguard into Linux, which indicates that Wireguard will officially be supported by kernel developers and integrated into future Linux distributions. Wireguard has become a popular VPN protocol due to its simplicity and security. An oft-mentioned fact is that Wireguard has ~100 times less lines-of-code (LOC) compared to another leading VPN protocol, resulting in fewer bugs and unintended behaviours, although LOC is not very rigorous.
I created this guide because there were too many guides with incorrect information (I'm looking at you Linode!). The setup procedures for Wireguard will change once most Linux distributions upgrade to the newest kernel, but the Wireguard configurations will still be relevant.
Step 1: Choose Server and Client
The Wireguard server will be responsible for accepting connections from clients, so it's best to assign the role to a computer with a stable network connection and IP address. I chose my cloud VPS to be the Wireguard server. That means all other devices, such as laptops, phones, and desktops will be the clients.
Start by assigning static network addresses for your server and clients. For example:
I assigned the following IP address to my devices:

Public Server: 192.168.2.1
My MacBook: 192.168.2.101
My iPhone: 192.168.2.102
Note that each device will have an individual private/public keypair.
Step 2: Install Server Software
Next we install Wireguard on our server. For the OS, I chose Debian 10 but Ubuntu 18.04 or higher works as well. For Debian, the installer will have to compile a kernel module since Wireguard needs to run in kernel space (will be obselete in Linux 5.6 with mainlining). The following commands are for Debian 10.
First we upgrade:
sudo apt update
sudo apt upgrade
sudo reboot
Then we install Wireguard:
sudo su
apt install linux-headers-$(uname -r)
echo "deb http://deb.debian.org/debian/ unstable main" > /etc/apt/sources.list.d/unstable-wireguard.list
printf 'Package: *\nPin: release a=unstable\nPin-Priority: 90\n' > /etc/apt/preferences.d/limit-unstable
apt update
apt install wireguard
reboot
Now we can generate the keypair for encrypting the connection.
sudo su
cd /etc/wireguard
umask 077
wg genkey | tee privatekey | wg pubkey > publickey
Step 3: Configure Wireguard Server
Now we can create the main /etc/wireguard/wg0.conf configuration file. Make sure to paste in your private key from /etc/wireguard/privatekey for the PrivateKey section of the file. Also, replace both ens1 instances with the interface the server connects to the internet with.
[Interface]
PrivateKey = <Server Private Key Here>
# the server address for the wg0 interface network
Address = 192.168.2.1/24

# NAT
PostUp = iptables -A FORWARD -i wg0 -j ACCEPT; iptables -t nat -A POSTROUTING -o ens1 -j MASQUERADE;
PostDown = iptables -D FORWARD -i wg0 -j ACCEPT; iptables -t nat -D POSTROUTING -o ens1 -j MASQUERADE;

ListenPort = 51820
Warning: Don't add SaveConfig = true, this will seriously mess up the config file over time. Also, make sure to shutdown the Wireguard interface whenever you edit the configuration file, with sudo wg-quick down wg0.
Enable the Wireguard interface, and enable auto-start.
sudo wg-quick up wg0
sudo systemctl enable wg-quick@wg0
Step 4: Configure Wireguard Client
There are official Wireguard installers for each OS, from the Wireguard website.
For macOS
Install Wireguard from the Mac App Store. Open Wireguard and click Add Empty Tunnel.

It should pre-populate the configuration with a private key. Name the VPN config whatever you like.
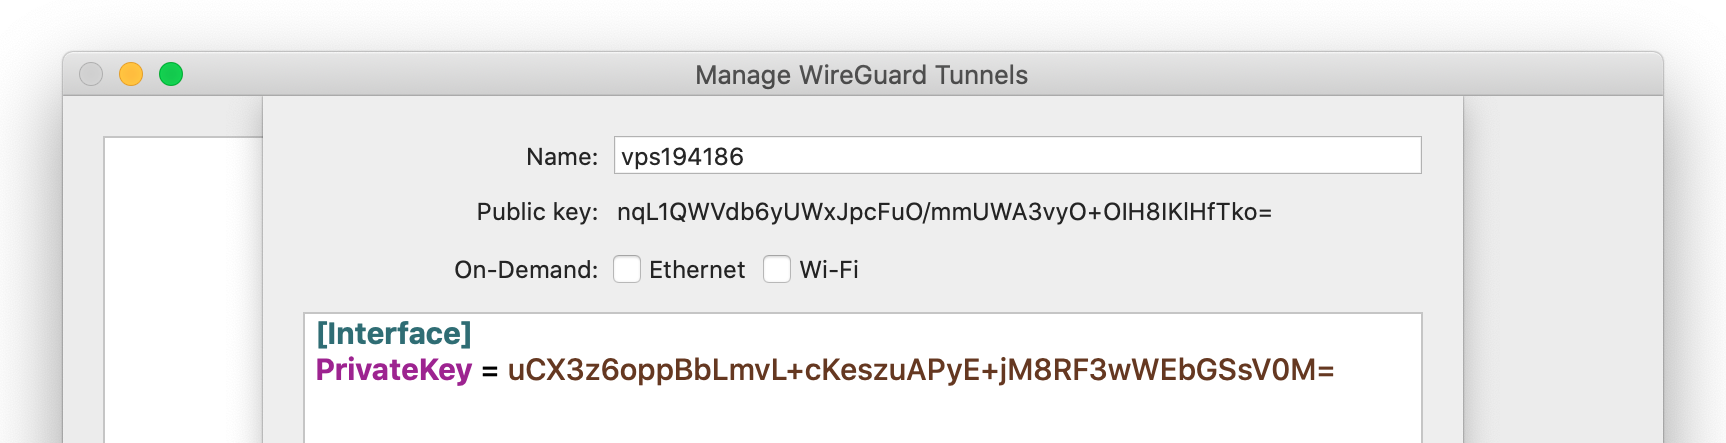
Edit the config using the following as a template. Make sure that the Address for the Interface has a subnet of /32. For the DNS, you can choose any DNS service such as Quad9, Cloudflare, etc. Replace the sections in brackets with your server details.
[Interface]
PrivateKey = <Client Private Key>

# the client's address inside the Wireguard network
Address = 192.168.2.101/32
DNS = 9.9.9.9

[Peer]
PublicKey = <Server Public Key>

# allow all ip addresses to be routed to the server
AllowedIPs = 0.0.0.0/0

# remove the line if you are not behind a NAT, or if battery life > packet deliverability

PersistentKeepalive = 55

Endpoint = <Server IP or Address>:51820
For iOS
Install Wireguard from the iOS App Store. Launch Wireguard, tap Add a tunnel, then select Create from scratch. Then tap Generate keypair. Name the VPN config whatever you like.
Use the configuration template from the section above to fill in the Interface details. Lastly, tap Add peer and fill in the Peer details.

Step 5: Server and Client Unite!
On the Wireguard server, shutdown the Wireguard interface with sudo wg-quick down wg0. Next, append the following to the /etc/wireguard/wg0.conf config file. The client public key can be copied directly from the Wireguard GUI. Modify the AllowedIPs to the static IP assignment from earlier, ensuring that the subnet is /32. Repeat for each client you wish to grant access.
[Peer]
PublicKey = <Client Public Key>

# the client's address inside the Wireguard network
AllowedIPs = 192.168.2.101/32
Next, enable IPv4 forwarding on your server. Finally, bring up the Wireguard server with sudo wg-quick up wg0, and connect to it using your clients.
Warning: If you see multiple [UFW BLOCK] IN=wg0 in your kernel log, run the following UFW command to enable forwarding on the wg0 interface, otherwise random packets may be dropped.
sudo ufw route allow in on wg0