Self-Hosting Part 4: iOS + macOS Backup
Introduction
Before we reach the finale of our Self-Hosting Series, we'll be taking a look at replacing iCloud's backup solutions. The main iCloud backup solution, iCloud Backup, is actually only for iOS devices, so I'll consider iCloud Drive's "macOS Desktop & Documents" syncing a backup solution that needs replacing as well. We will divide this post into two parts, for iOS devices and macOS devices respectively. For iOS, we will be using tools from a library called libimobiledevice, specifically idevicebackup2. For macOS, we will be creating a script that uses BorgBackup. In both cases, we will focus on enhanced security, to reduce the chance of malicious corruption of the backup. You can omit the security choices depending on your own risk model.
iOS Backups
The libimobiledevice library was created to facilitate access to iOS devices, and has been in active development for over a decade. The most important tool is idevicebackup2, which as the name suggests will create an iOS backup. I believe the backups are identical to that of iTunes, which means that all settings, app data, and user files will be backed up. In order to backup passwords and health data, encryption must be enabled, which can ne done through a command line flag. The following outlines the extra security steps that can be taken.
Creating a VM
Since it's hard to fully trust the stability and security of the backup library, we will be running the backup tool in a Debian 10 virtual machine (VM). For VM management, libvirt is preferred. Start by creating a standard VM definition using one of the many available guides.
USB Passthrough
Next, we passthrough a USB controller from the host to the VM to allow the VM to have full access to the iOS/USB connection. This can be done either with the USB chipset on the motherboard, or with an external PCIe USB card. If you have both XHCI and EHCI controllers, you should first try to passthrough the XHCI controller.
The reason for using PCI passthrough, instead of using the USB passthrough capabilities of QEMU, is because iOS devices are extremely finicky and renogotiate often with the PC, meaning they disconnect and reconnect frequently. When QEMU disconnects the iOS device to attach to the guest, the iOS device believes it is attached to a new computer and disconnects itself again, which causes an endless loop. You can find out more about using PCI-passthrough on my guide to PCI passthrough for macOS guests
This was the block I added to my VM definition, under <devices>:
    <hostdev mode='subsystem' type='pci' managed='yes'>
      <source>
        <address domain='0x0000' bus='0x00' slot='0x14' function='0x00'/>
      </source>
    </hostdev>
ZFS Snapshots
Moving on, the default behaviour of idevicebackup2 is to first create a full backup, then do an incremental backup when the same iOS device is encountered again. Unfortunately when doing incremental backups, idevicebackup2 overwrites the previous backup, so you only have a backup of the most recent state. In order to have previous backups available, we can either create a full backup each time, or save space by creating a snapshot of the directory before each incremental backup.
I decided to use the snapshot functionality of ZFS running on the host, with a dataset passed to the guest through as a 9p virtio device. The guest can access the ZFS dataset as a regular directory, even while we perform ZFS operations on the dataset. You can find many guides to creating ZFS datasets, although try to use one that provides native ZFS encryption (contrary to popular belief, double-bagging encryption is not a problem!). The commands I used to create my encrypted ZFS pool and ZFS dataset were:
# Generating the encryption key
dd if=/dev/urandom of=key bs=32 count=1
xxd -p key | tr -d '\n' && echo

# Creating the zpool (works for both SSD and HDD)
zpool create -o ashift=12 -O acltype=posixacl -O dnodesize=auto -O normalization=formD -O relatime=on -O xattr=sa -O encryption=aes-256-gcm -O keylocation=prompt -O keyformat=hex \
   rust mirror sda sdb

# Creating the dataset
zfs create rust/ios_backups

# Give QEMU read/write access to directory
chown libvirt-qemu:kvm /rust/ios_backups
ZFS snapshots can be scripted easily, e.g. zfs snapshot rust/ios_backups@20200320.
Directory Passthrough
The following is the 9p virtio block in the VM definition. Edit the source directory to match where you want your iOS backups to be stored.
  <filesystem type='mount' accessmode='mapped'>
    <driver type='path' wrpolicy='immediate'/>
    <source dir='/rust/ios_backups'/>
    <target dir='/ios_backups'/>
  </filesystem>
Then, add the following line to the guest's /etc/fstab to enable automount. The first argument is the "<target dir>" that we defined above, and the second argument is the mount point within the VM.
/ios_backups /ios_backups 9p trans=virtio 0 0
Finally, run sudo chgrp kvm /rust/ios_backup to allow the KVM process to modify of the folder.
Compiling idevicebackup2
The commands listed here are for Debian 10, but the steps should be applicable to all other distros as long as the build requirements are met.
First we install basic development tools and required libraries.
sudo apt install -y build-essential autoconf automake libtool autoproject pkg-config libssl-dev libusb-1.0-0-dev git python-dev
Next, we follow an install guide from the libimobiledevice GitHub, which takes care of installing the required iOS and USB libraries.
sudo useradd -r usbmux --shell /usr/sbin/nologin
sudo usermod -g plugdev usbmux

git clone https://github.com/libimobiledevice/libplist.git
git clone https://github.com/libimobiledevice/libusbmuxd.git
git clone https://github.com/libimobiledevice/libimobiledevice.git
git clone https://github.com/libimobiledevice/libimobiledevice-glue.git
git clone https://github.com/libimobiledevice/usbmuxd.git
cd libplist/
./autogen.sh; make; sudo make install
cd ../libimobiledevice-glue/
./autogen.sh; make; sudo make install
cd ../libusbmuxd/
./autogen.sh; make; sudo make install
cd ../libimobiledevice/
./autogen.sh; make; sudo make install
# load new libraries into cache
sudo ldconfig
cd ../usbmuxd/
./autogen.sh; make; sudo make install

# debug?
# sudo rm /var/run/usbmuxd
# sudo rm /var/run/usbmuxd.pid

sudo reboot
Using idevicebackup2
After restarting the VM, plug in your iOS device to a USB port, which should immediately prompt you to "Trust This Computer?". After trusting the computer, test to see if the pairing was successful by running ideviceinfo. If you see a long list of properties, the iOS device is communicating properly.
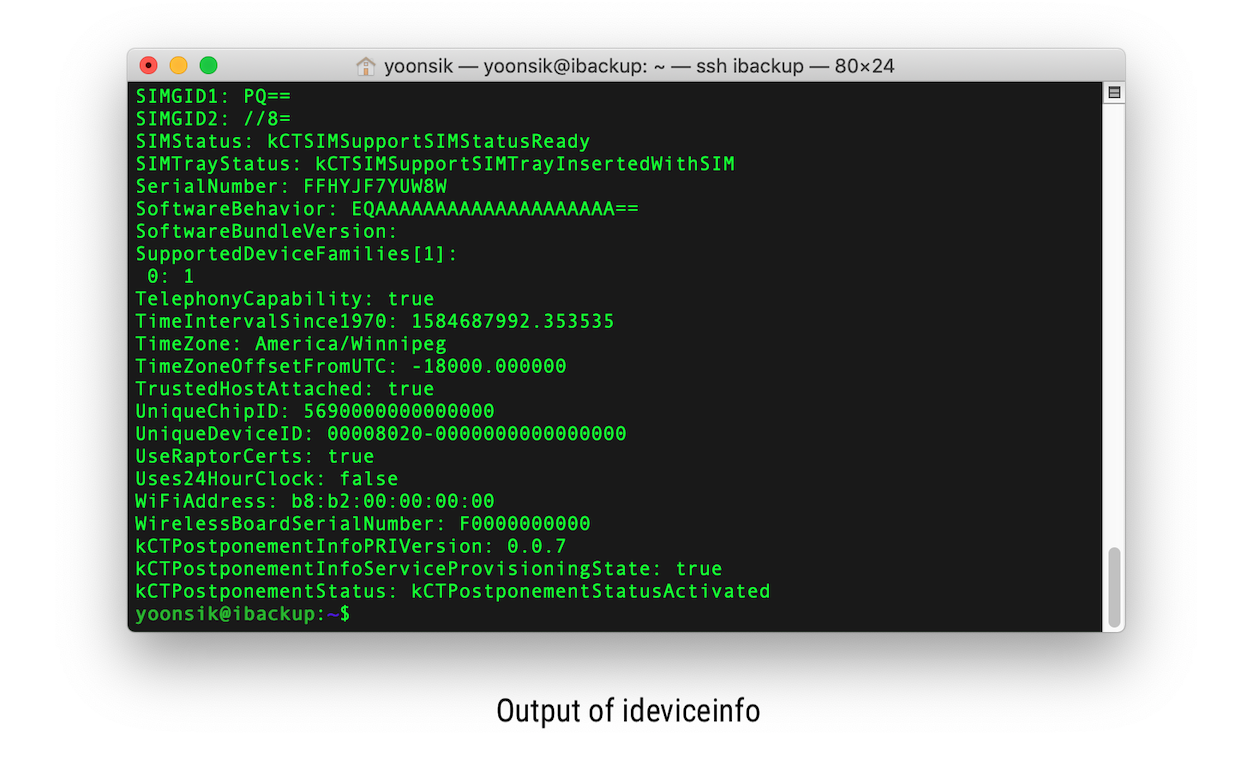
You can find the Unique Device Identifier in the output from above, or use the command idevice_id -l. Each iOS device has a unique ID, which allows you to distinguish between them. This is important, for example, when restoring a backup to a different or new device. Finally, change into the mounted 9p directory and run the following commands:
# Disable iCloud Backup
idevicebackup2 cloud off

# Enable Backup Encryption
idevicebackup2 -i encryption on

# Backup into Current Directory
idevicebackup2 backup ./
As mentioned earlier, this will trigger a full backup. Once this is complete, snapshot the ZFS dataset from the host using the command above. For subsequent backups, run the same command again, which triggers an incremental backup. Rinse and repeat.
Extending idevicebackup2
I haven't had time to extend my iOS backup solution yet, but I imagine the possibilities are endless! Since each backup per iOS device is stored in an separate folder, you could hook into the udev rules to automate backups as soon as the iOS device is detected. You could also set up a daily cron job in the host, to SSH into the backup VM, trigger a backup, snapshot the dataset, and send an alert/email that the backup has completed.
Restoring a Backup!
A backup guide wouldn't be complete without actually restoring from a backup, would it be now? Let's assume the situation where your previous phone has been phone-napped, and you want to restore your latest backup to a new phone. This means that you need to consider the Unique Device IDs for each phone.
First, activate your new iPhone. At some point during the setup procedure, it will present you with the following screen:
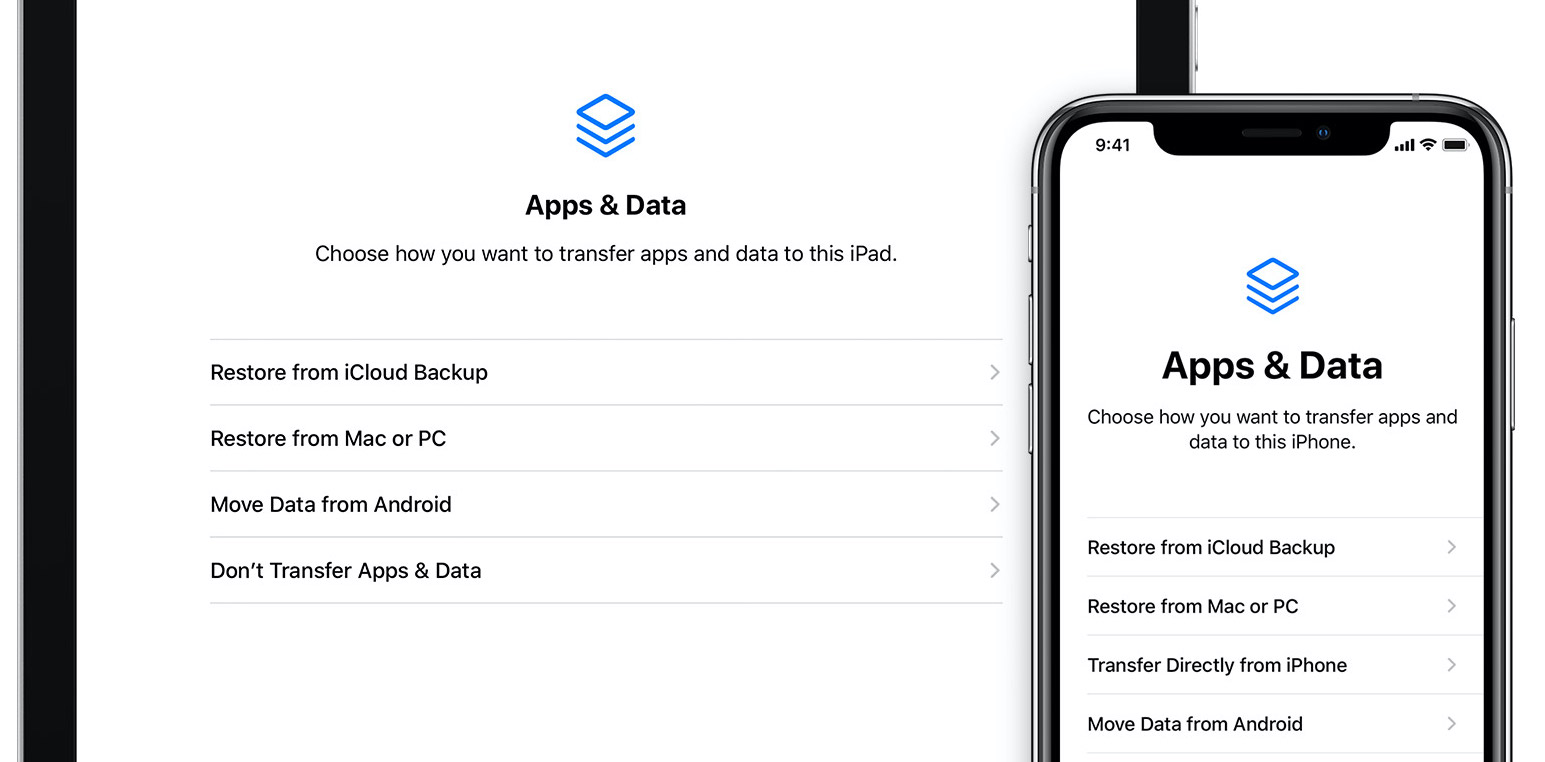
Choose "Restore from Mac or PC", and connect your iPhone to the computer. Run ideviceinfo | grep ActivationState, and check that it says "Activated".
Change into the directory with your backups, which should contain a folder with the original iPhone's UDID:
yoonsik@ibackup:/ios_backups$ ls
00008020-0000000000000000
Finally, run the following command, replacing the UDID in the command with that of your old backup:
idevicebackup2 -i -s "00008020-0000000000000000" restore --system --settings ./
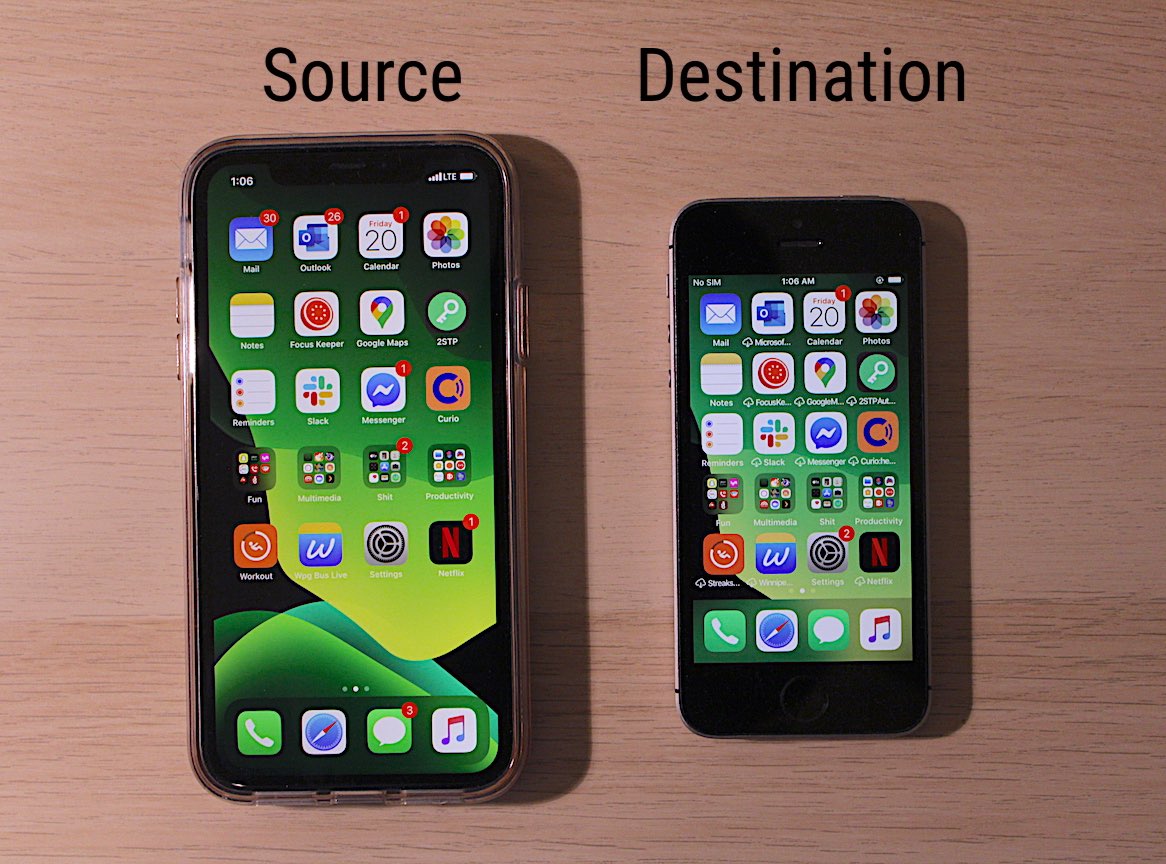
Here is some evidence of the successful restoration:
macOS Backups
This section is relatively short, as most of the basics of BorgBackup were covered in my previous post. BorgBackup effectively replaces Time Machine, as well as the backup functionality of iCloud Drive "Desktop & Documents". If you have an asymmetric internet connection (mine is 100D/15U), then using BorgBackup on a local network can provide a speedup of two magnitudes.
Since BorgBackup uses SSH to encrypt data with forward secrecy en route, and my ZFS drive provides encryption at rest, I decided to create my BorgBackup repo without encryption enabled. This makes uploading files faster, but if you don't trust the destination server, make sure to enable BorgBackup encryption as well.
We need to create a new user on the destination server to limit access to only the backup directory, and then limit SSH connections to only specific borg commands using .ssh/authorized_keys. Create a new user using the adduser command:
yoonsik@shady:~$ sudo adduser backup2
Adding user `backup2' ...
...
Is the information correct? [Y/n]
Next, we create a backup directory and give full ownership to the newly created user:
mkdir /rust/backup/macbook
sudo chown backup2:backup2 /rust/backup/macbook
Switch to the source computer, run ssh-keygen to generate a key, and run ssh-copy-id to copy over the public key to the destination server. Finally, on the destination server, edit the authorized_keys file. Prepend the key entry in the file with the following command restrictions:
# nano ~/.ssh/authorized_keys
command="borg serve --restrict-to-repository /rust/backup/macbook",restrict ssh-rsa AAAA...
Modify --restrict-to-repository to the directory you created earlier. The --append-only flag can be added if you want to prevent deletion of previous backups. You can find out more about the limitations of the --append-only flag on the BorgBackup docs, and find out more about the serve command as well.
Now we initialize the Borg repository, from the destination server:
borg init backup2@shady:/rust/backup/macbook
Finally, we run the borg create command on the source computer. The following is the script I use to backup my entire home folder from macOS.
#!/usr/bin/env bash
export BORG_REPO='backup1@shady:/rust/backups/macbook'
borg --progress create ::macbook-$(date +%s) ~/ --noatime --noctime --nobsdflags --exclude '*/.cache/borg'
And this is the script I use to backup only my essential files. I found most of these macOS file exclusions from a StackExchange answer.
#!/usr/bin/env bash
export BORG_REPO='backup1@shady:/rust/backups/macbook'
borg --progress create ::macbook-$(date +%s) ~/ --noatime --noctime --nobsdflags \
  --exclude '*/Library/Application Support' \
  --exclude '*/Library/Caches' \
  --exclude '*/Library/Containers' \
  --exclude '*/Library/Logs' \
  --exclude '*/Library/Metadata' \
  --exclude '*/Library/Safari/*.db' \
  --exclude '*/Library/Safari/*/' \
  --exclude '*/.TemporaryItems' \
  --exclude '*/.MobileBackups' \
  --exclude '*/MobileBackups.trash' \
  --exclude '*/.MobileBackups.trash' \
  --exclude '*/.Spotlight-V100' \
  --exclude '*/.TemporaryItems' \
  --exclude '*/.Trashes' \
  --exclude '*/.Trash' \
  --exclude '*/.com.apple.backupd.mvlist.plist' \
  --exclude '*/.fseventsd' \
  --exclude '*/.hotfiles.btree' \
  --exclude '*/Backups.backupdb' \
  --exclude '*/.cache/borg' \
  --exclude '*/Downloads/*.iso' \
  --exclude '*/Downloads/*.dmg' \
  --exclude '*/Desktop/*.dmg'
Note that you will have to provide "Full Disk Access" to Terminal.