$15 HDMI Capture Card Review
Above is a sample of 60fps Super Smash Bros Ultimate gameplay (I'm a Jigglypuff main) recorded with the $15 HDMI Capture Card and OBS. This card has been making the rounds last month on Twitter, as well as on YouTube, mainly due to its low, low price of $15 USD. I've decided to get one myself and take a look. The chipset contained in the card is the MacroSilicon MS2109. Here is the review, as well as a discussion of the potential use-cases.
Operating System
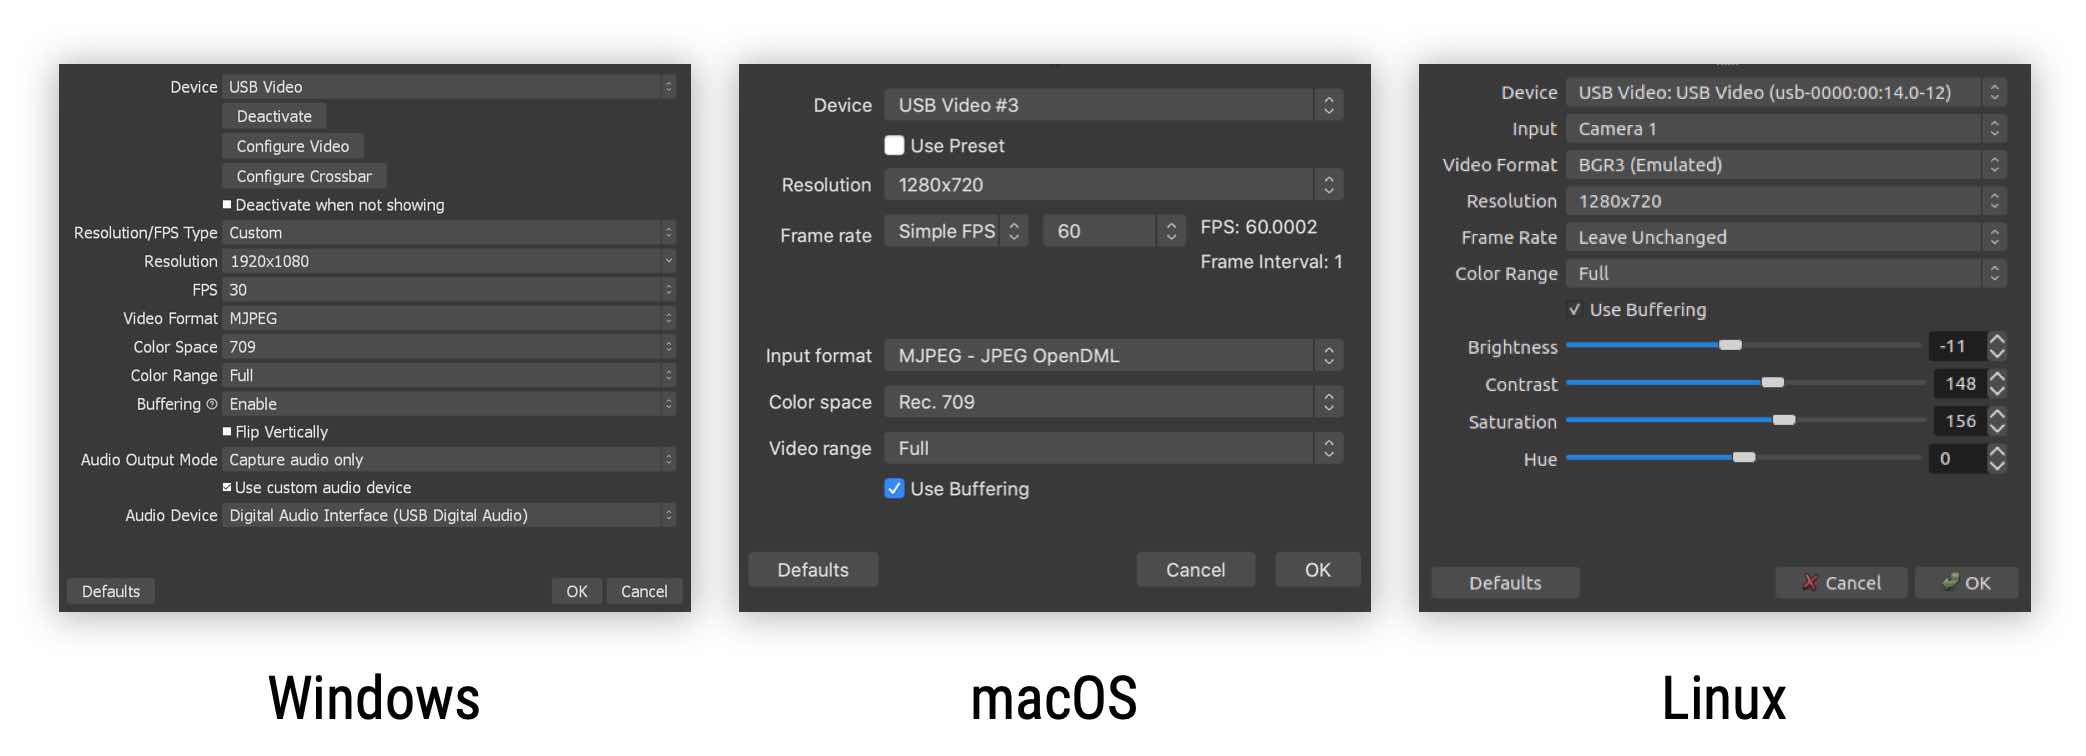
This card, surprisingly enough, works on Windows, macOS and Linux! This is because it implements the UVC standard, a USB device that is OS agnostic. Getting it working on Linux is a bit of a hassle, but you can find out how here.
I noticed that using the capture card on Linux or macOS resulted in significantly more framedrops and synchronization issues, when compared to Windows (although the macOS issues might be due to weak CPU). If you are okay with slightly choppy or stuttery recordings, then feel free to use the card on macOS or Linux. The Windows UVC driver captures more frames, and has the most options of the three. Most of the guide will be focusing on the Windows driver. The controls that are listed in OBS for each operating system are shown below.
YUY2 vs MJPEG
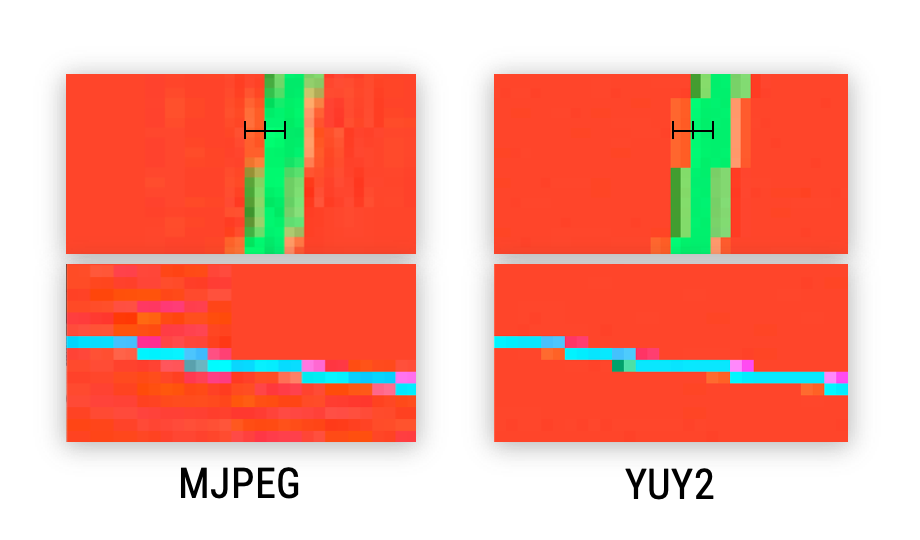
Windows and Linux both support the YUY2 and MJPEG video format, while macOS only supports MJPEG. YUY2 in this context refers to an almost uncompressed form of data (except for colour information), while MJPEG uses lossy JPEG compression on every frame. This means that YUY2 provides a cleaner image with no compression artifacts, while MJPEG has a noisier and blockier image. Compare the two capture formats below:

As you can see MJPEG has degraded the image data, which is necessary to compress each frame to a small size. Only MJPEG can achieve high framerates with this card because the interface it uses, USB 2.0, caps out around 50 MB/s. For reference, a YUY2 1280x720 60fps signal would exceed 100 MB/s. If you want a card that supports a 60fps YUY2 signal, you can expect to pay in the range of hundreds of dollars.
Both the YUY2 and MJPEG video formats from this card use something called chroma subsampling, a data saving trick that takes advantage of the human eye's decreased colour resolution. It essentially deletes colour data, while keeping brightness data intact. I tested both formats, and they are outputting a 4:2:2 signal (50% of the colour data is deleted). You can see that the horizontal axis changes colour at 2 pixel boundaries, while the vertical axis changes at 1 pixel boundaries.
Resolution and Framerate
A wide variety of resolutions and framerates are supported on the input side of the device. It even supports input at 4K 60fps! From the NVIDIA Control Panel, here is an abridged list of the resolutions and framerates supported on the input side:
4K    60,59,50,30,29,25,24,23Hz
1080p 60,59,50Hz
720p  60,59,50Hz
576p  50Hz
480p  60,59Hz
PC    60Hz
To clarify, just because this card can accept or capture a 4K signal, does not mean that it can send the full signal to your computer. This card contains a scaler, which scales the image down (or up, depending on the input) in resolution before it is sent. With reference to the OBS properties window, here is an abridged list of the resolutions and max framerates as seen by my Windows PC:
1920x1080 MJPEG:30fps, YUY2:5fps
1600x1200 MJPEG:30fps, YUY2:5fps
1360x768  MJPEG:30fps, YUY2:?
1280x960  MJPEG:50fps, YUY2:?
1280x720  MJPEG:60fps, YUY2:10fps
1024x768  MJPEG:60fps, YUY2:10fps
800x600   MJPEG:60fps, YUY2:20fps
720x480   MJPEG:60fps, YUY2:30fps
Each resolution dictates a maximum framerate for the device, limited by the bandwidth of the USB interface. To summarize, this card supports an output of 1920x1080 30fps and 1280x720 60fps with the MJPEG format.
Resolution and Framerate Caveats
First I'll talk about framerate. I noticed that recording or streaming from the card at 60fps tends to repeat or skip a frame every few seconds, even with buffering on. Make sure to keep buffering on, otherwise you will lose frames at 30fps as well. I have confirmed this by recording videos in OBS and analyzing them frame by frame.
If you want virtually perfect frame capture at both 720p and 1080p, you should use 30fps with buffering!
Also, you may notice that there are 29.97fps and 59.94fps options in OBS. Only use these if you are absolutely sure that your device needs these values. You will likely run into desynchronization issues if you accidentally use these framerates.
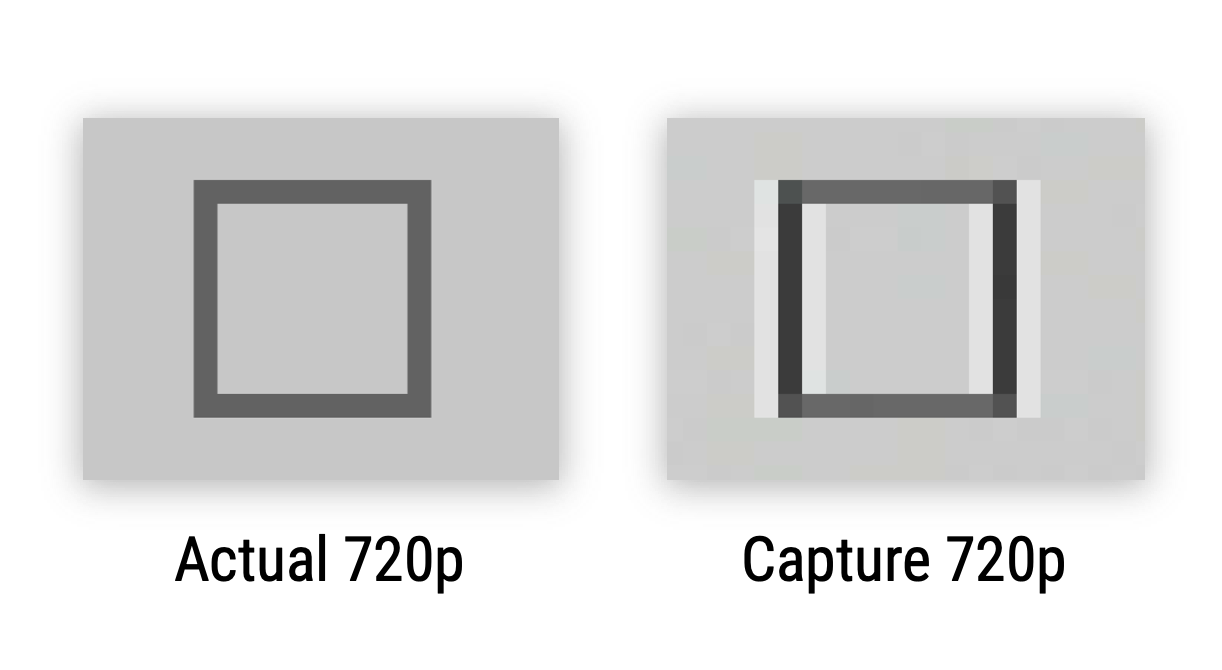
Next, when I tested the 1920x1080 capture, I was shocked by how blurry it was. It turns out that this card doesn't actually do true 1080p! Here's a screenshot of Wikipedia, compared to what was captured at 1920x1080.

It looks like the card is capturing the vertical resolution fine, but the horizontal resolution is a soft mess. I tried out 1280x720, and everything looked crisp and fine, leading me to suspect that the card was capturing internally at a resolution of 1280 columns. I ended up using display calibration images from Lagom LCD to see how the pixels in the capture were behaving. Right click the following image and choose Open/View Image for a better view.

Using the reference on the left, we can see that 1280x720 has correct vertical and horizontal resolution. 1360x768 and 1920x1080 also have correct vertical resolution, but the columns are turning grey. This is because adjacent white and black pixels from the high input resolution are merged into a lower resolution, i.e. from 1920 columns into 1280 columns. If you also noticed that pixel columns are brighter than the rows, I will be talking about that in the next section.
As a quick aside, everything above was for progressive video input. Interestingly, this card also supports an input of 1080i/interlaced video, which I tested with macOS and my Canon 600D camera. Using 1080i was absolutely horrible for desktop recording, since the card uses a brainless deinterlacing algorithm that halves the vertical resolution to 540. Yes, it actually looks that bad. As for my camera, it was decent, but the edges were kind of funny.
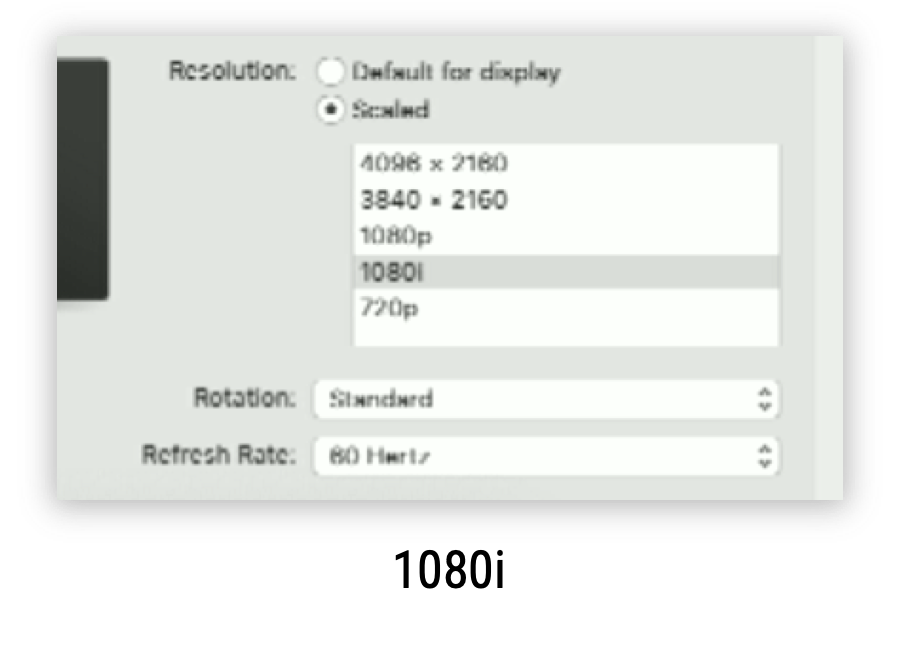
Image Accuracy Caveats
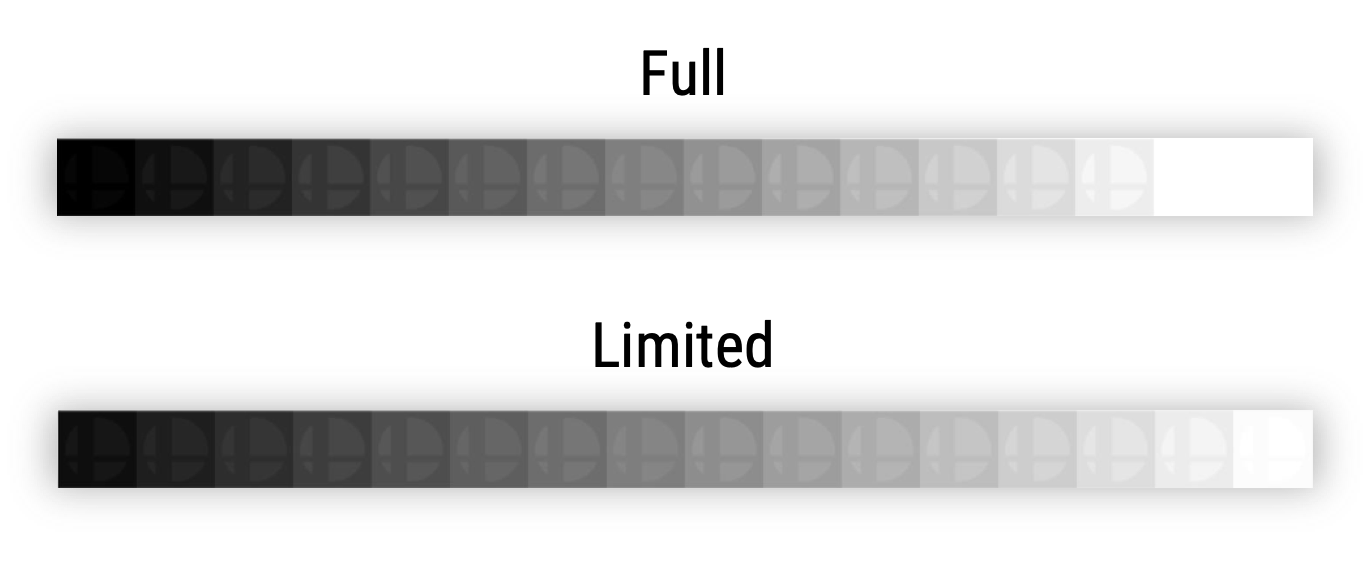
This card needs "Color Range" set to "Full" in the OBS Capture Card Properties. Any devices that are connected to the card input need to have their HDMI "Range" set to "Limited". This is the only correct combination, otherwise highlights and shadows in the video are clipped. The following shows the effects of the device range options.
As you might have noticed from the previous section, the 1280x720 capture is brightening the columns. This indicates that the card is performing image sharpening only in the horizontal direction. You can find evidence of this type of sharpening wherever there are sharp edges:
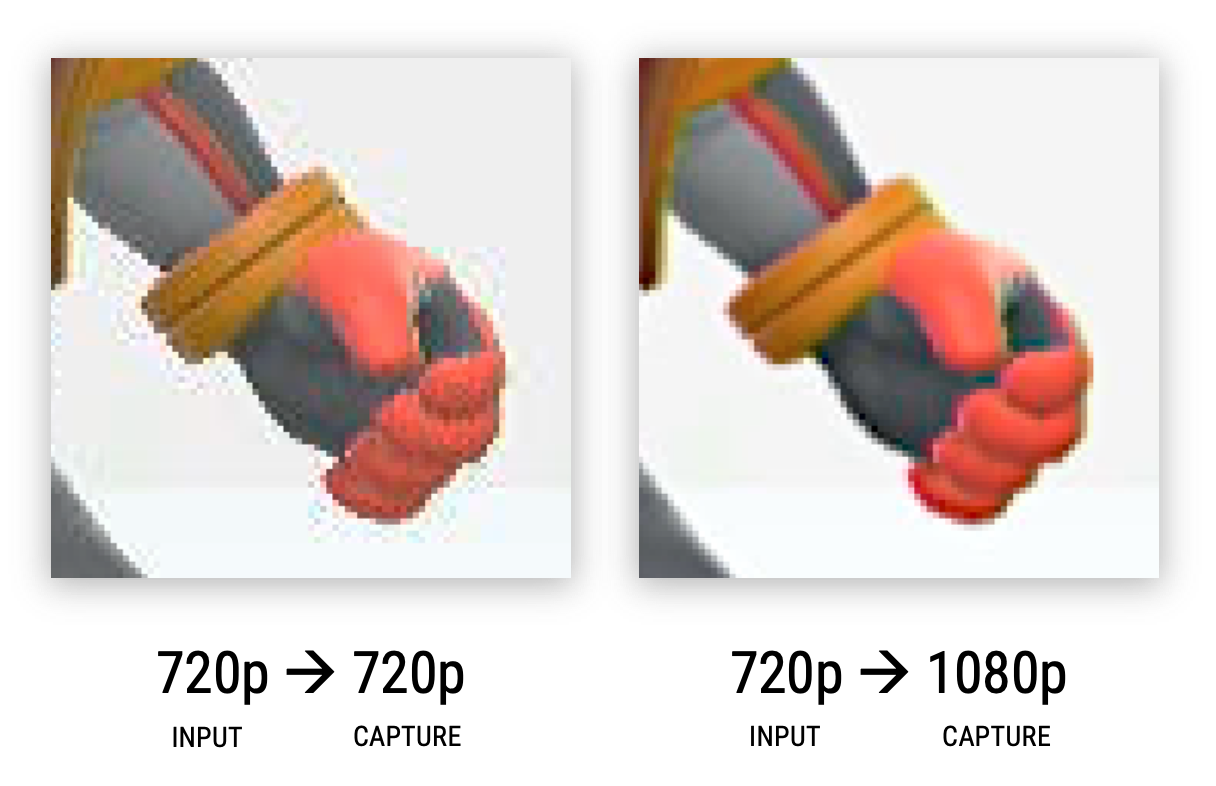
This is a bad feature, as all image sharpening should be done after the capture. Fortunately, there is a way to get around this for 1280x720 content. Simply set your device to 1280x720, and then capture at 1920x1080. The image loses some clarity in brightness changes, due to the unnecessary resize, but all the sharpening has disappeared! Furthermore, since we are receiving 1920x1080 data, we now have better colour resolution as well, close to 4:3:3 chroma subsampling.
The 1920x1080 MJPEG capture also has significantly less compression artifacts than the 1280x720 MJPEG capture, which is probably due to different framerate support. From the image below, you can see that the 1080p capture is the winner all around (sharpening was applied post-capture for comparison with 720p).
Conclusion
-
If you are capturing slower gameplay, i.e. only 30fps, set your device to 1920x1080 and then capture at 1920x1080. This provides the most brightness and colour resolution at 30fps.
-
If you have 1280x720 content, capture at 1920x1080. This will result in the least amount of sharpening and MJPEG artifacts.
-
If you are capturing a desktop screen or anything with thin lines and pixels, then set your device to 1280x720 and then capture at 1280x720.
-
If you need 60fps content, i.e. for gaming, then set your device to 1920x1080 and then capture at 1280x720. This disables sharpening. The sample at the beginning of the article was encoded with "x264" at the "veryfast" setting.
Warning: if you see a listing for a $20 USD capture card that claims to support USB 3.0 and 1080p 60fps, it's a scam. I've already bought two of them from Amazon and eBay, and had to return both because they turned out to be a repackaging of the product I just reviewed!